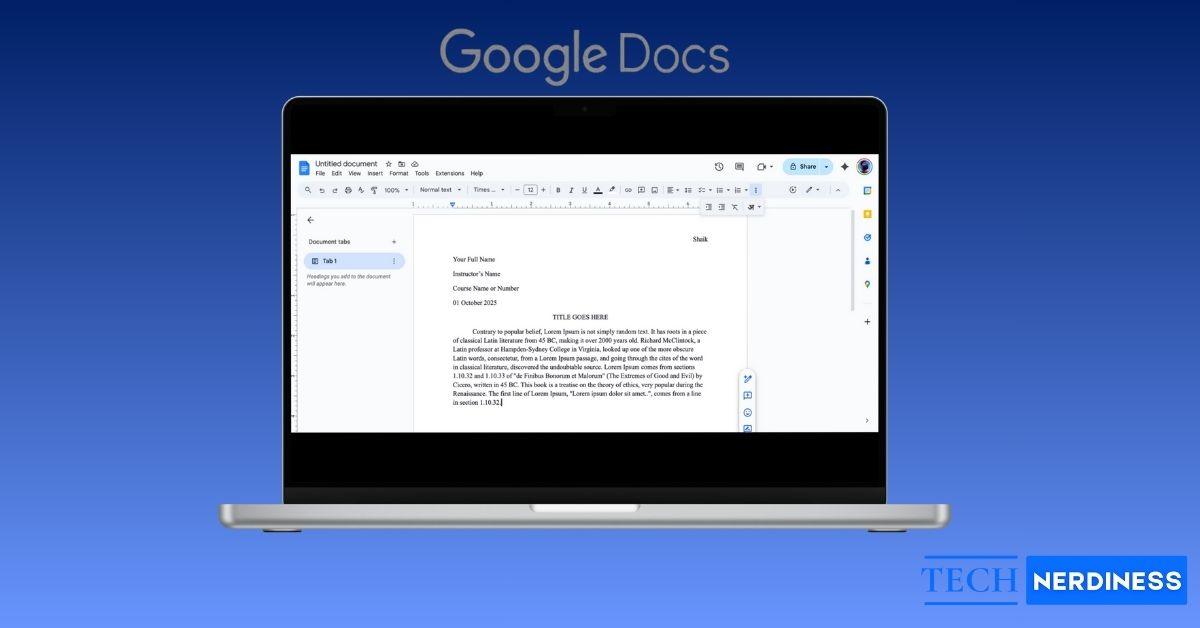
Formatting a paper often feels like the most tedious part of academic writing. After working hard on your essay or research, the last thing you want to do is worry about margins, headers, in-text citations, and hanging indents. But if you’re aiming for a good grade, following the proper format is essential.
The good news? You don’t need expensive software like Microsoft Word. Google Docs has everything you need to set up your paper in MLA format, and it’s completely free. From pre-made templates to built-in citation tools, Docs makes formatting much easier than it looks.
This guide walks you through how to set up MLA format in Google Docs, covering both the basics and advanced tools to save time.
What is MLA Format?
MLA format is a widely used set of rules for academic writing, created by the Modern Language Association. You’ll see it most often in the humanities, especially English, literature, foreign languages, and philosophy.
The purpose of MLA format is to give papers a consistent look, make them easier to read, and provide a standard way to cite sources.
Basic MLA Standards (Guidelines)
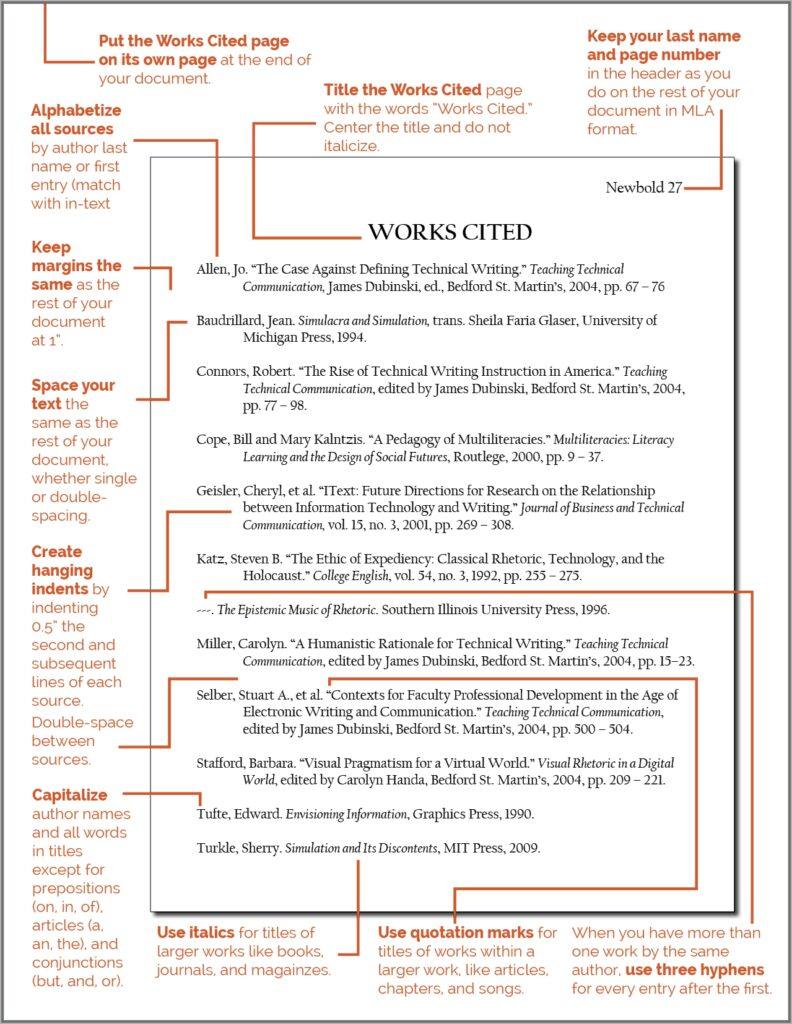
Before jumping into Google Docs, here’s a quick overview of MLA standards:
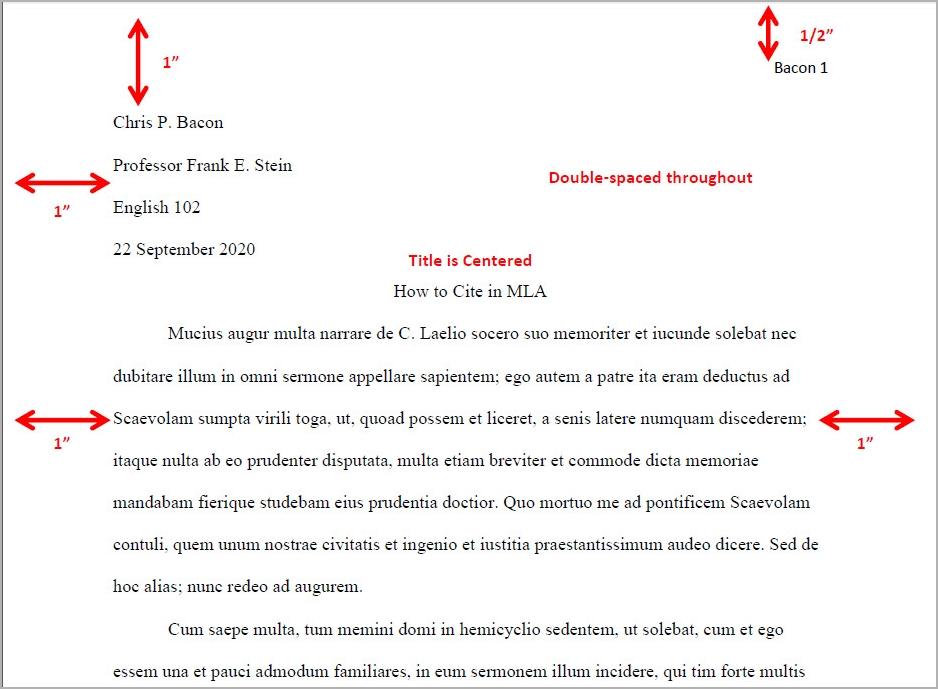
- Margins: One inch on the top, bottom, left, and right sides of the document.
- Spacing: Everything in the document, including its heading, title, body, and Works Cited page, has to be double-spaced. There shouldn’t be any extra spaces between the paragraphs.
- Font: The general recommendation is Times New Roman 12 size. Other basic readable fonts, for instance, Arial, are sometimes accepted, although the benchmark is Times New Roman.
- Paragraph Indent: Each body paragraph should have its first line indented by half an inch. The standard way to do this is by pressing the Tab key once.
- Block Quotations: When quoting a speech of more than four lines or a poem longer than three lines, it must be formatted as a block quotation. This entails setting the entire quotation one inch to the right of the left margin.
- Header (Running Head): Every page must have your surname and a page number in the top right-hand corner.
- First Page Details: The top left corner of the first page must have your name, the name of your instructor, the name or number of the course, and the date.
- Title: The title of your paper must be centered and placed right after the first page details, like all other titles. The title of the paper must be in title case, but is not allowed to be in bold, underlined, or italicized.
- Works Cited Page: This is the page where all the sources mentioned in the paper are listed. This page must be the last page, starting a new page.
How to Do MLA Format in Google Docs
You can set up MLA format in Google Docs two ways: by using the MLA template (fast and easy) or by manually formatting (step-by-step).
1. Using the MLA Template (Recommended)
You can set up MLA format in Google Docs in two ways: by using the MLA template (fast and easy) or by manually formatting.
To get started:
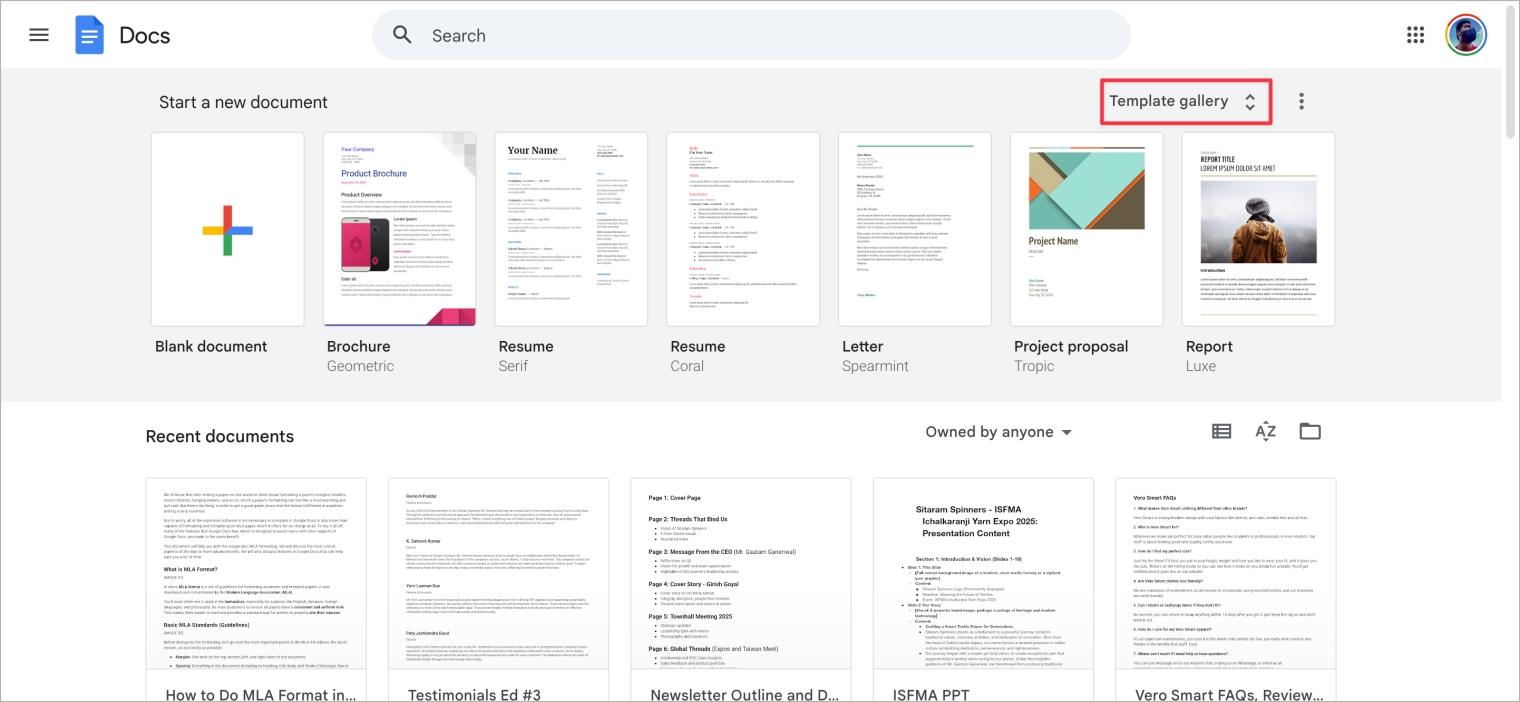
- Open Google Docs and select Template Gallery from the home screen.

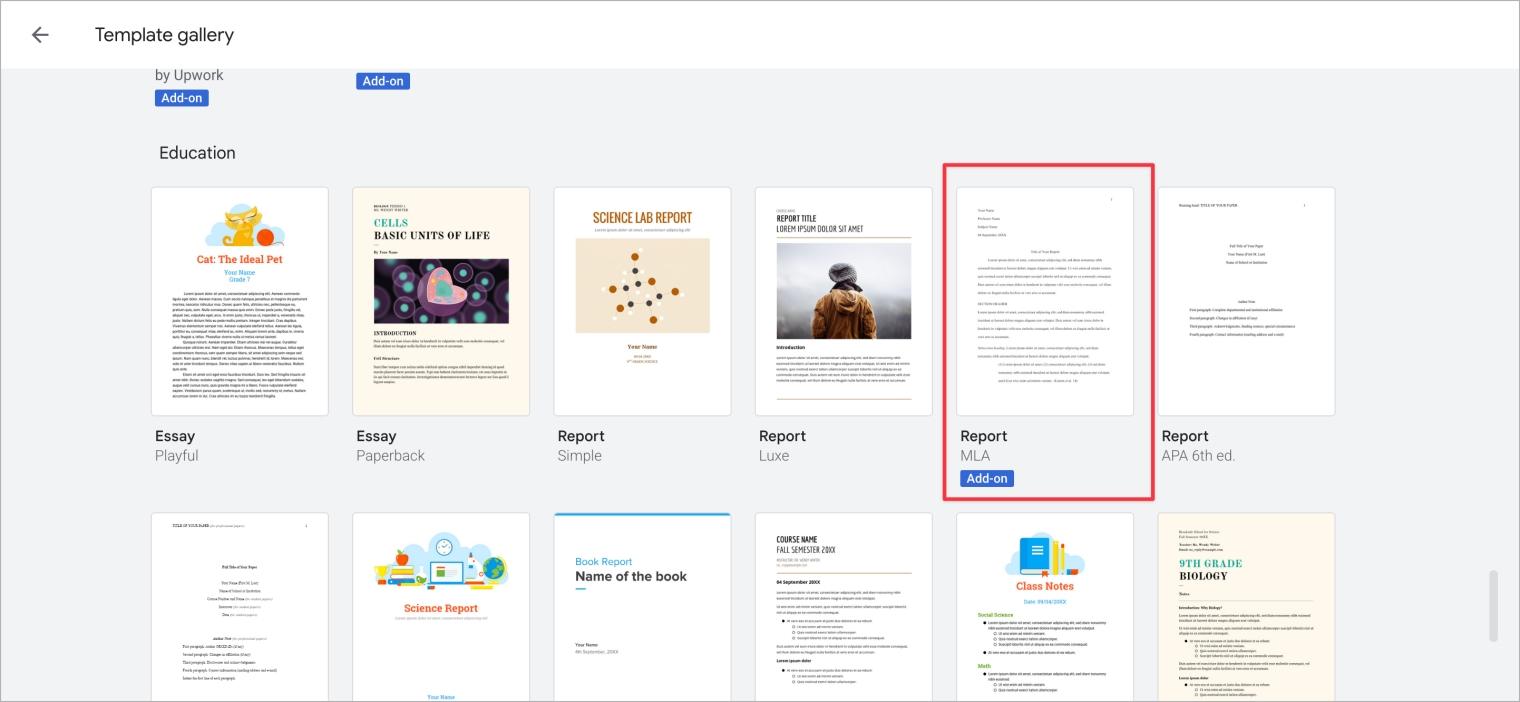
- Scroll to the Education section.
- Click Report – MLA template.
- Replace the sample text with your own details.

This is the easiest method since all the formatting is already built in.
2. Manual Formatting (Step-by-Step)
If you prefer full control, here’s how to format MLA in Google Docs manually:
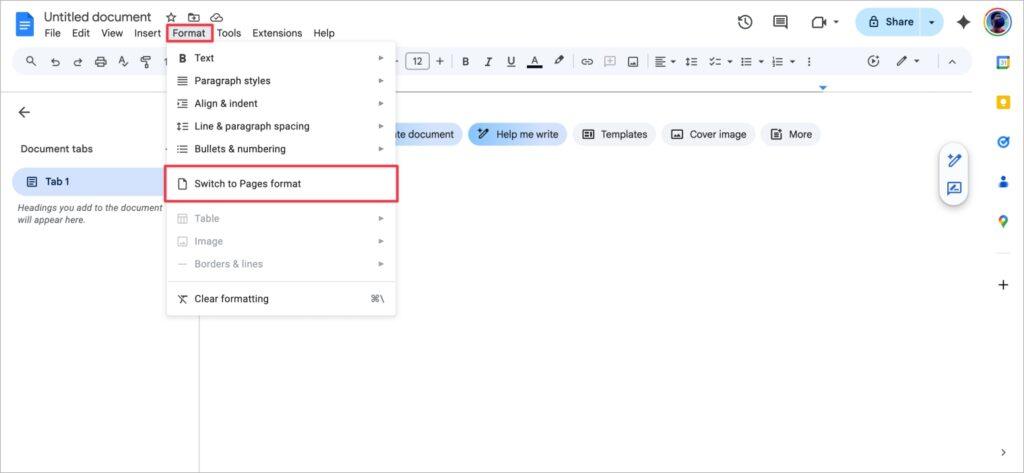
1. Set the Font and Spacing
To change the font on Google Docs, select Times New Roman with a 12-point font size. On the menu, line and paragraph spacing is the tool with a vertical arrow. Highlight it and select it, then choose Double from the list.
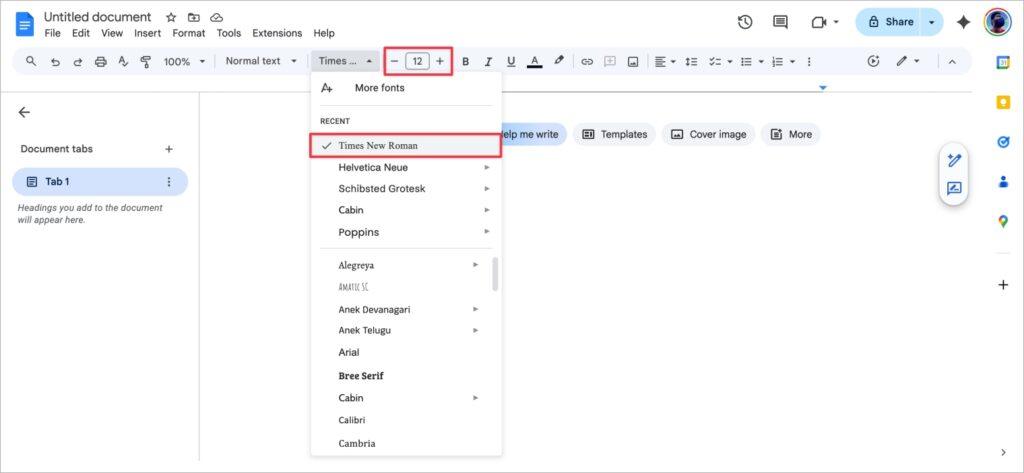
2. Adjust the Margins
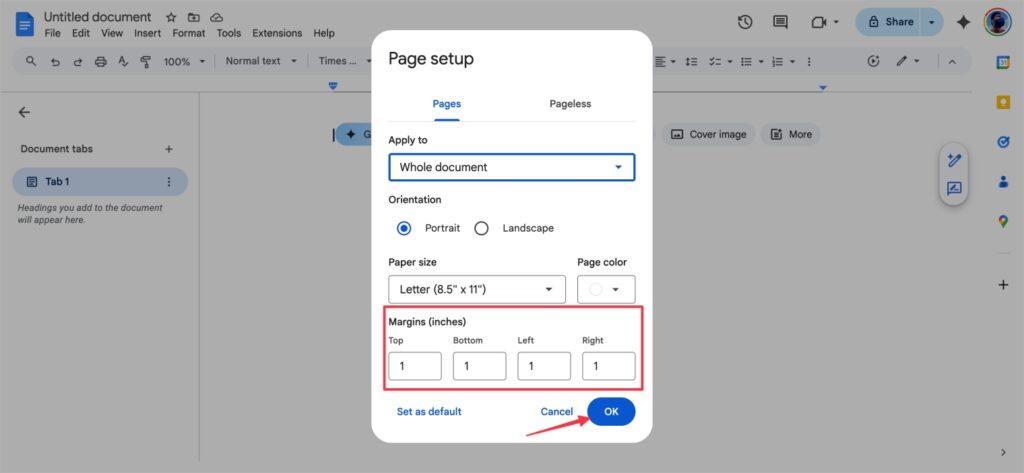
Go to File > Page setup. In the pop-up window, select the Page tab, and make sure the margins Top, Bottom, Left and Right are all set to 1. Then, click OK.
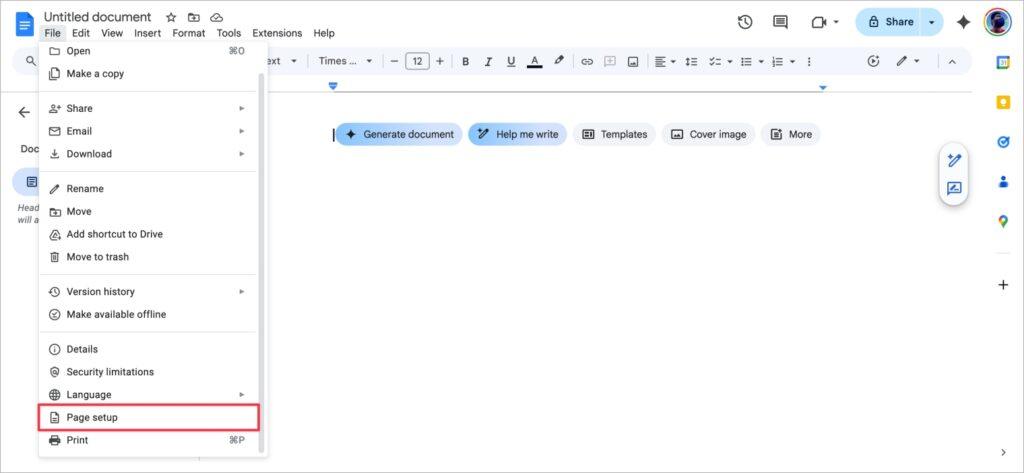
3. Set the Header
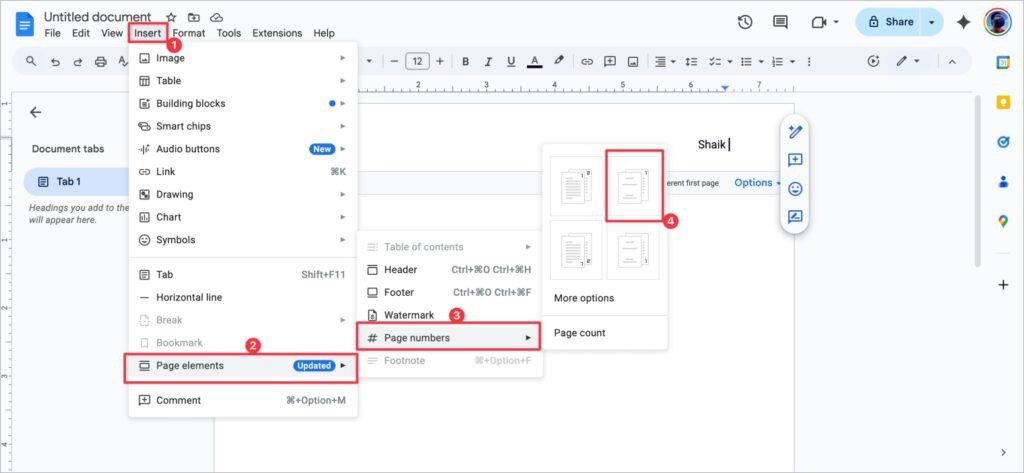
Go to Insert > Page Elements > Header. Your cursor should be in the header now. From the toolbar, click the Right align icon. Enter your last name and a space after that.

Go to Insert > Page numbers and select the option with the number in the top right corner.
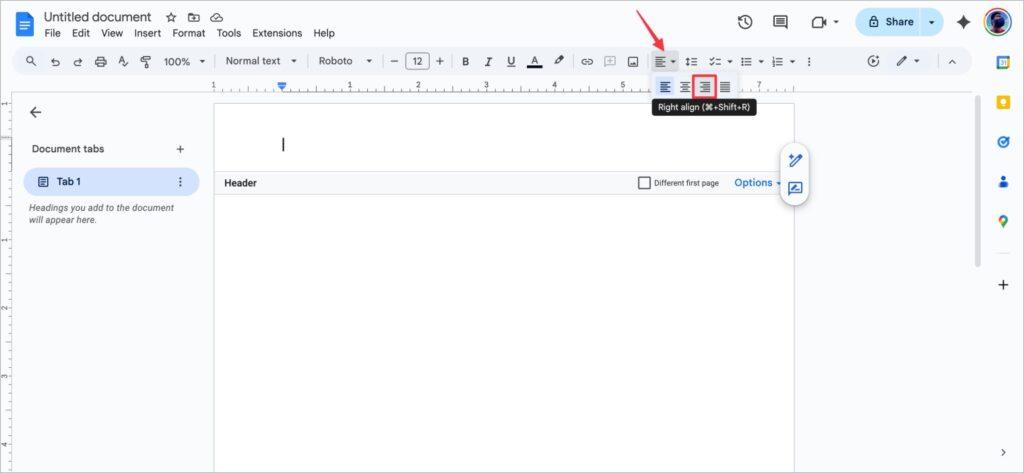
Check the header font; it should be Times New Roman, size 12. To exit the header, click outside the header or any part of the main body of the document.
4. Fill in the First Page Details
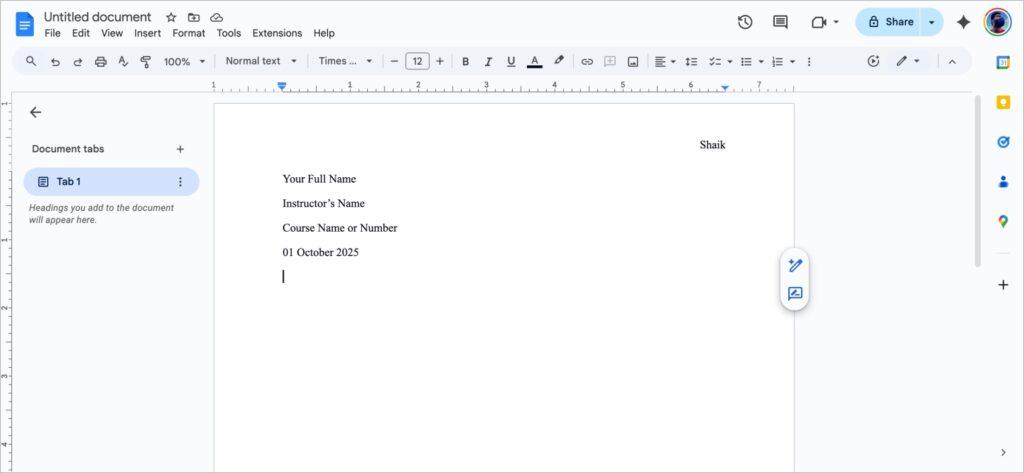
Place the cursor right at the top of the page and make sure it is aligned to the left.
- Enter your whole name and then click Enter.
- Enter your instructor and click Enter again.
- Now enter the course name or number, then click Enter.
- Type the date in the format Day Month Year in the box at the bottom of the screen and click the Enter button.
5. Add the Title
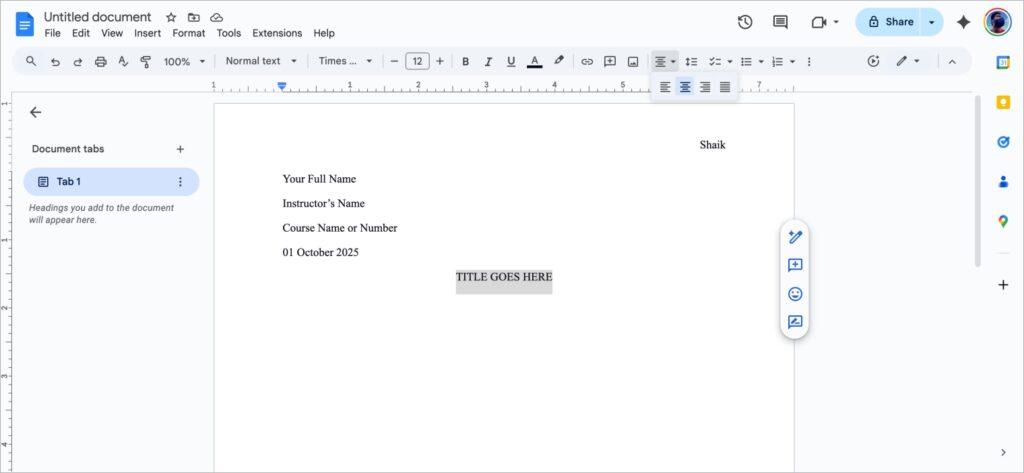
Space the date and click Enter once. Select the Center align icon on the toolbar. Type the title of the paper now. Take note that title case capitalization should be used (the first, last, and all major words should be capped). The title should not be bold, underlined, or italicized.
6. Style the Main Body of the Paper
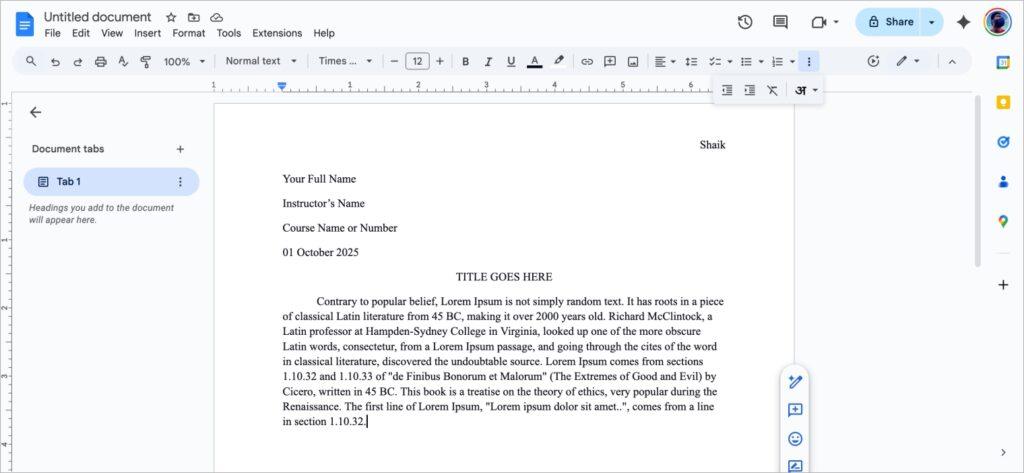
Space the title and click Enter once. Select the left-align icon on the toolbar. Hit the Enter button, and the first line of the paper should be indented by half an inch. You can now start the paper. If a new paragraph is being started, the Tab button should be pressed to indent.
Also Read: How to Blur Your House on Google Maps
How to Do MLA Works Cited in Google Docs
You can create your Works Cited page in Google Docs either manually or with the built-in citation tool.
Manual Works Cited Setup
If you don’t use the automatic tool or want full control, you can manually format your Works Cited page. It takes more attention to detail, but ensures the result is exactly how you want it. Here’s how:
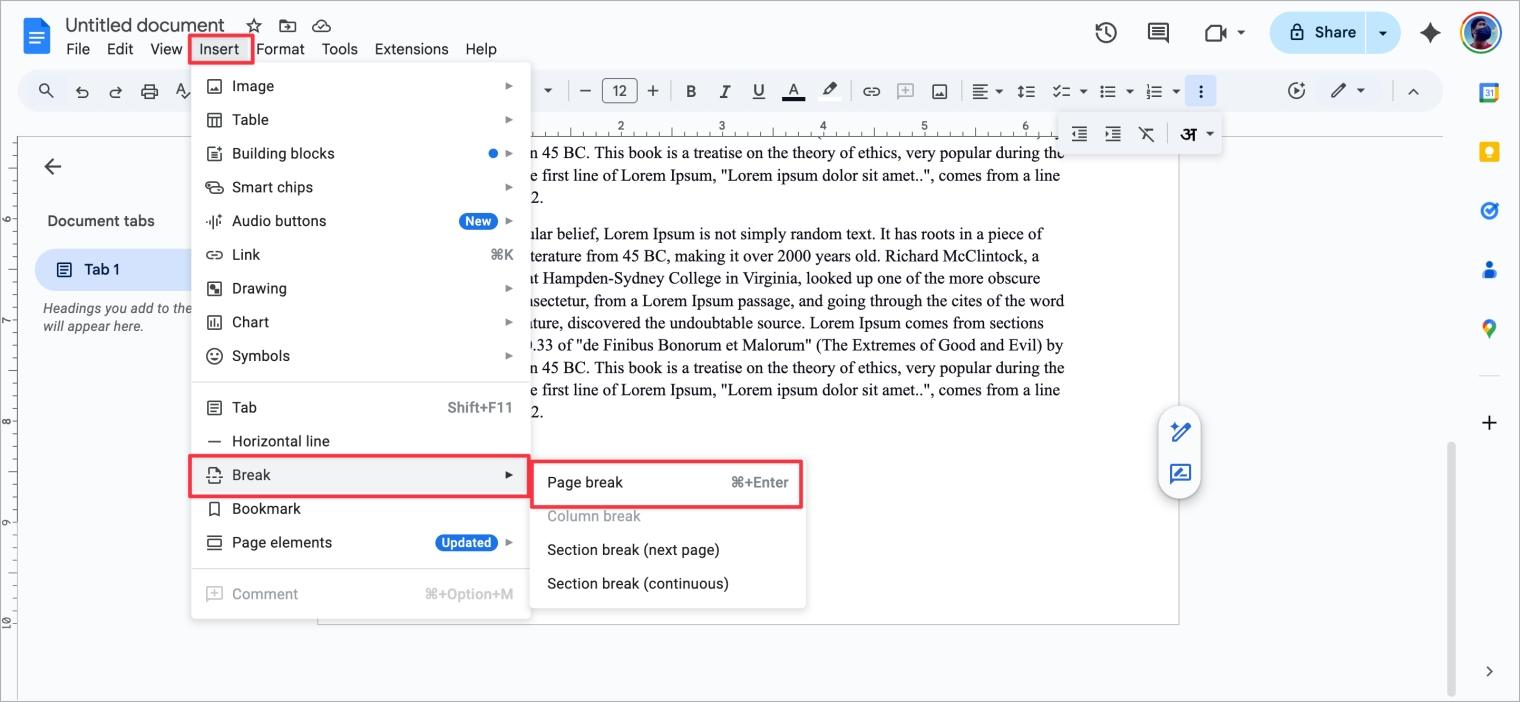
- Start a New Page: At the end of your paper, go to Insert > Break > Page break to start a fresh page.

- Create the Title: At the top of the new page, click the Center align icon and type Works Cited. Do not bold, underline, or italicize this title. Press Enter once.
- List Your Sources: Click the Left align icon. Type or paste your citations, ensuring they are listed in alphabetical order by the author’s last name. The entire page must be double-spaced.
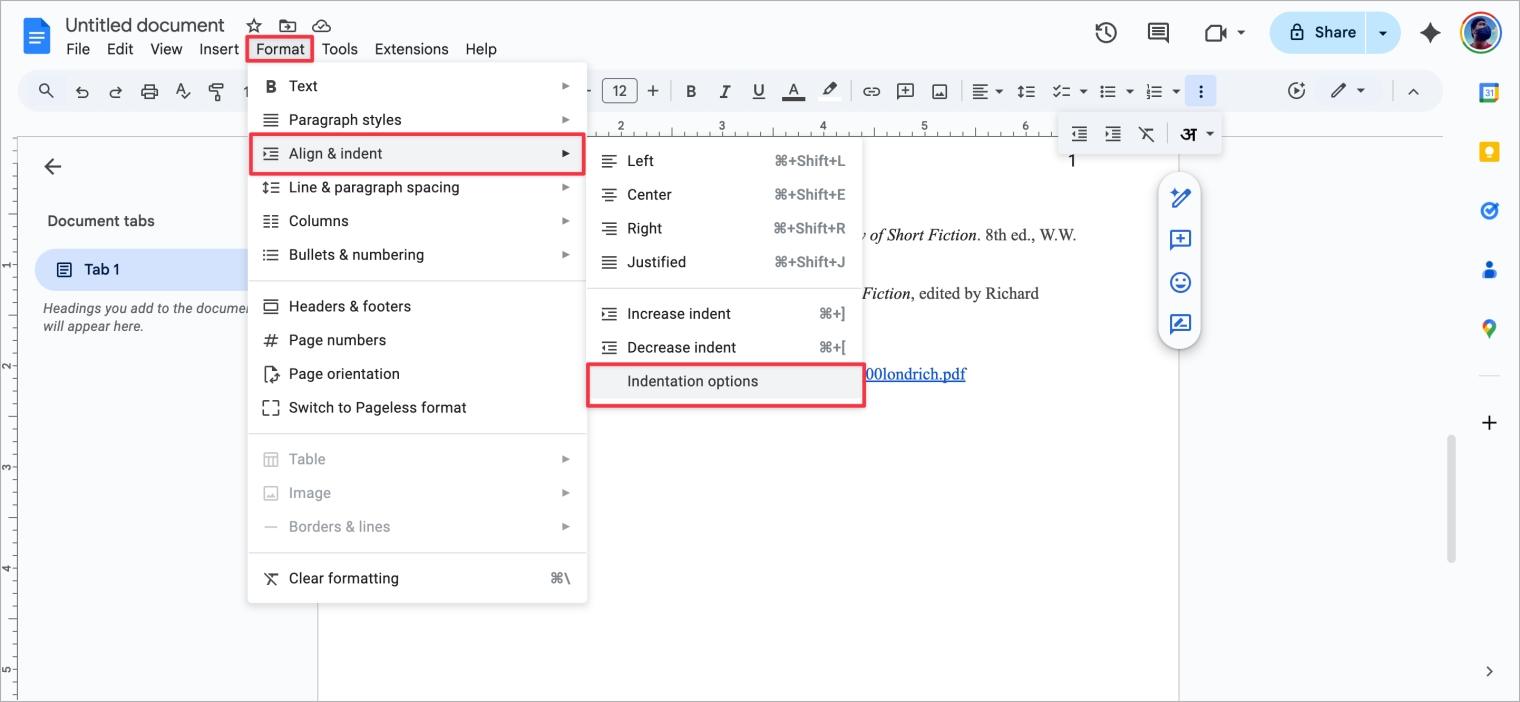
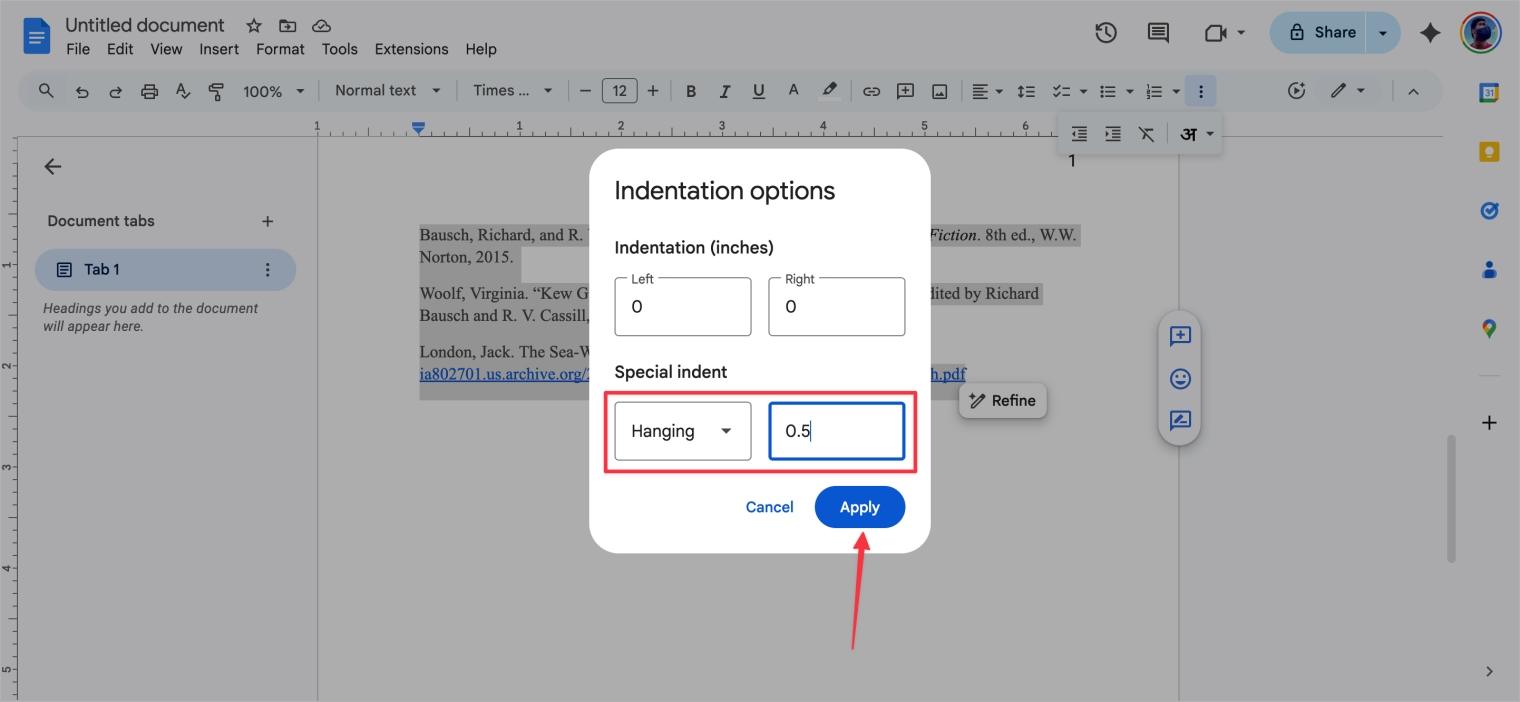
- Apply a Hanging Indent: The most crucial step is the hanging indent, where the first line of each citation is flush with the left margin, and all subsequent lines are indented by a half-inch. To do this:
- Highlight all of your citations.
- Go to Format > Align & indent > Indentation options.

- Under “Special indent,” select Hanging from the dropdown menu.
- Ensure the value is set to 0.5 inches and click Apply.

Citations are very important in MLA format. Google Docs offers amazing and easy tools to help manage the sources used.
Use Google Docs’ Built-in Citations Tool
This will help with in-text citations and also create a Works Cited page.
Step 1. Open the Citations Tool
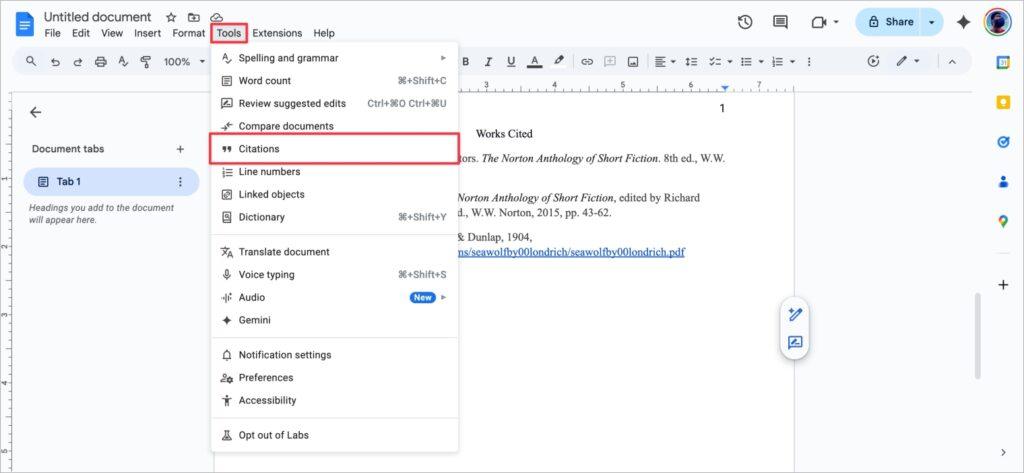
Click the Citations icon in the Tools Tab, and a sidebar will appear on the right of the screen. Make sure MLA is selected in the dropdown.
Step 2: Adding Additional Sources
To include in your list of sources to an auto-generated bibliography, click the + Add citation source button.

- Select which type of source it is, such as a book, a website, a journal, and so on.
- Select which type of source it is, such as a book, a website, a journal, and so on.
- Select the format in which you accessed the source: Print, website or an online database.
- Enter the contributor and publication information for your source, and the tool will tell you which parts you still need to fill.
- To save, click Add citation source. Go through and do the same for all the citation sources you want to include in your paper.
Step 3: Adding In-Text Citations
To cite sources in your paper, position your cursor on the location where you wish to insert your citation. Under the Citations sidebar, hover the mouse on the source you wish to cite and click on the Cite button. The tool is smart enough to add an in-text citation automatically as well. In this case, it goes for (Shaik), and if slide numbers are given, it will do this too.
Step 4: Creating the Works Cited Page
Toward the end of your document, after all the writing has been completed, go to a new page. Under the Citations sidebar, you will see an Insert Works Cited button. Click this. A full list is generated and presented in the correct, alphabetized order, including all the Works Cited. Google Docs formats it correctly, including any hanging indents.
Other Useful Google Docs Features
Explore these handy tools in Google Docs that can save time and improve your workflow.
- Voice typing helps speed up the writing process. Go to Tools > Voice Typing and start dictating to create documents more quickly.
- Wi-Fi isn’t required to work. Go to File > Make Available Offline to edit documents anytime without an internet connection.
- For long research documents, use Insert > Bookmark to link and quickly jump to specific sections.
- Google Docs supports internet-based add-ons like citation managers, plagiarism checkers, and word finders, helping improve documents.
- Google Docs saves your work automatically. You can share it with your instructor using the share button or download it as a PDF or Docs file via File > Download.
Final Thoughts
At first glance, MLA format seems overwhelming, but with Google Docs, it’s much simpler than it looks. Whether you use the MLA template or format everything manually, Docs gives you the tools to create a professional paper that meets academic standards.
Once your formatting is set, you can focus on what really matters: your writing.
FAQs
MLA style prefers Times New Roman font, but other 12-point, easily readable serif and sans-serif fonts such as Arial and Georgia are usually permitted. A best practice is to check the directions given by your instructor. When in doubt, use Times New Roman.
To create a hanging indent for your Works Cited page manually, highlight your citations, go to Format > Align & indent > Indentation Options. Under “Special indent”, set to “Hanging” and ensure it’s set to a half an inch.
No, it doesn’t. If you have already inserted the Works Cited page, you must delete the old list and then click “Insert Works Cited” to replace it with the new version, which will include the new sources.
Like other tools, Google Docs is equipped with a Citations tool that has set rules and guidelines on how to treat sources missing key pieces. In most cases, you omit the author and begin with the other id that is available, often the title.
Yes. You can directly access the Google Docs app and use it to do MLA reports from your iPhone, and also from Android, which allows you to complete the paper from any location.
You might also like:

